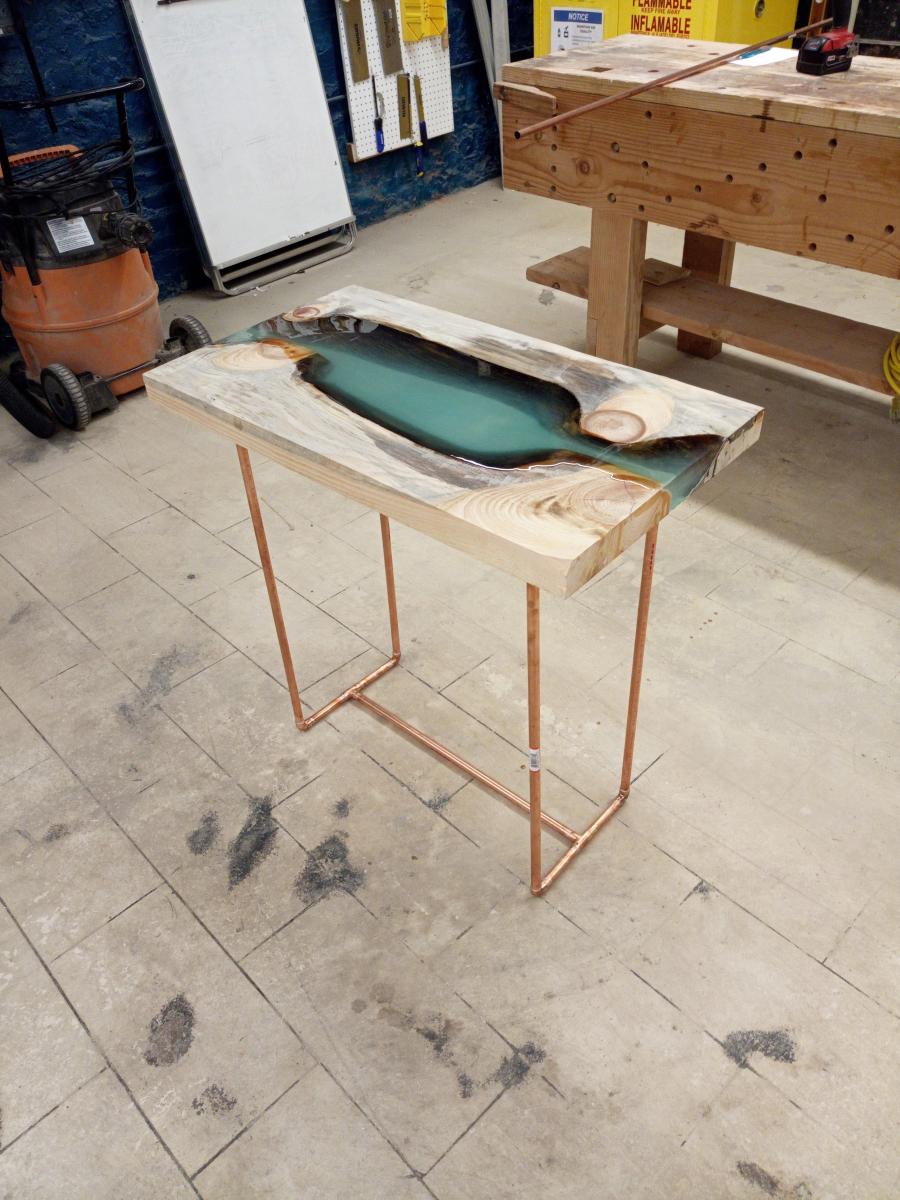
It's a table!
A starter project involving cutting a live edge slab in half and gluing it back together with resin. This project mainly requires basic resin use and standard wood prep.

You have a slab! Wonderful! Now you need to cut it in half so we can more easily work with each side as well as set it up for resin pour (image 1).
\r\n
There are a few ways to cut this: on the Table Saw or with the circular saw. Either way expect this to be a rough cut.
\r\n
For the table saw, choose which edge you want to reference off of; this side will be against the fence. Do not use a featherboard for the other side, as an irregularly shaped side may get stuck on it. Proceed to cut as usual.
\r\n
\r\n
For a circular saw, draw a line down the middle of your slab; cut as usual.
\r\n

We will need a flat face on the bottom of the table to create a nice seal for the resin; we also want a flat edge for the outside of the table. To do this, we wil want to perform a face joint and an edge joint. Do this for both slabs.
\r\n
\r\n
After both pieces are jointed, take the piece with the thinnest thickness and plane until either the top is flat or until desired thickness. Use this as your maximum table thickness, and plane the other piece to the same height.
\r\n
\r\n
Clean up the ends of the pieces on the chop saw so that each piece is the same length. Perform all your sanding here to make your process easier in the end; if you sand the resin surface, it can be hard to fix by hand or could be fixed by coating the scratch in more resin.
\r\n

Now we will need to make a sealed-off mold for the resin to dry onto.
\r\n
I used acrylic sheets for this project because it is rigid and epoxy resin does not stick to it; I have also used blocks of wood coated in packaging tape for an almost equivalent performance. Just be sure to take out the wrinkles in the tape!
\r\n
\r\n
You will need to cover three sides: the two ends and the bottom. Place your wood in the desired configuration on top of the bottom-piece acrylic, then hot glue the end pieces onto the wood edges. Make sure that the end pieces are flush with the edge of the botom piece; we want a water-tight seal.
\r\n

Next we will want to seal off the edges of the slab against the acrylic; I use silicon caulk. To lign up the two slabs, place scrap wood on both ends of the acrylic end pieces and clamp them together. This alligns both pieces as well as holds the acrylic end pieces tightly to the bottom sheet.
\r\n
\r\n
Now using silicone gel, trace out every joint; this creates a the seal for your resin, so be sure to get every crack you do not want the resin to seep through. This is important because resin is a sneaky mum. Hot glue can sometimes work instead, though it can be a bit tricky getting it into the other nooks.
\r\n

After the silicone dries, it's ready for the first pour.
\r\n

Not all resin is created equal, so do your research beforehand if you want to shop around. I use ProMarine Supplies Crystal Clear Table Top Resin Epoxy; it is easy to use, very forgiving, and performs exactly how I'd like it to. Really easy to color too! Epoxy can be a bit expensive, however; this will require between 1-4 gallons depending on your table gap size.
\r\n
\r\n
Mix the resin as instructed by the supplier, coloring as desired. Unless indicated otherwise doable, pour a layer only a few 8ths of an inch thick; too thick and it will not dry correctly. After pouring the first layer to dry, use the heat gun on low to skim over the top and pop the top layer bubbles. This will make this layer more clear. For extra clarity, repeat the heat gun step 5 minutes apart until bubbles stop rising to the surface.
\r\n
\r\n
Let this layer sit over night, then repeat this step until you fill your river to the top.
\r\n

For the final layer, if you want the resin to be used as a protective coat, continue to fill the slabs until the resin spills over the edges and completely coats the tabletop.
\r\n
\r\n
If you want the wood exposed, be sure to only fill the resin to where you want it; it is extremely difficult to remove.
\r\n

Remove the acrylic sheets, and all you need to do is add the legs! I used brass tubing for this; this required fittings and copper sweating the pipes together.
\r\n
\r\n
Use at least ø1/2" brass pipe, type L for the legs otherwise you may get a lot of wobbling.
\r\n
I attached the copper to the wood via the screw plates shown below; I then connected the pipe via a threaded female tube.
\r\n
\r\n

And that's it! You're done! Congratulations on your new table!
\r\n